


What Is Nest.js?
Nest.js is one of the fastest-growing Node.js frameworks for building efficient, scalable, and enterprise-grade backend applications using Node.js. It is known for producing highly testable, maintainable, and scalable applications using modern JavaScript and TypeScript.
Nest.js is a perfect solution for your next project if you need to build a scalable, maintainable, enterprise-level application.
In the next section, we’ll explore what it is used for and different companies using the framework in production.
What Is Nest.js Used For?
Nest.js is a server-side Node.js framework that’s great for building highly testable and maintainable backend applications. You can create countless types of applications with Node.js you’re only limited by your applications’ features.
Since the framework leverages TypeScript, Nest.js is especially popular with teams seeking to leverage TypeScript’s type-checking power. What’s more, it’s simple to learn and master, with a powerful CLI to boost productivity and ease of development. This powerful CLI makes it a breeze to jump-start any server-side project and see it to completion.
In addition, Nest.js maintains detailed documentation, and its community of developers and contributors is very active and ready to respond to issues on the fly.
These reasons make it easy to see why so many companies are switching frameworks in favor of Nest.js. Below is a list of the few popular brands using the framework in production.
You can find a list of additional companies, projects, and tools built with Nest.js on GitHub.
Next, we’ll discuss why you and your company should choose Nest.js for your next project, and we’ll provide insight into why others already use the framework and its benefits.
Why Choose Nest.js
Choosing a framework is dependent on the type of application you’re developing, as different applications require a different set of tools.
Here, we’ll list different reasons to select Nest.js as your Node.js framework for upgrading or building your next project.
Nest.js is easy to learn and master, especially for developers coming from the Angular world. This makes for a quick and efficient development process as team members can easily adapt to any new development principles and structures.
The framework is known for having a great architectural structure for enterprise applications right out of the box, which makes building highly scalable and maintainable enterprise applications a breeze.
You can build backend services ranging from RESTful APIs, GraphQL applications, MVC applications, Web sockets, CLI, and Cron jobs with Nest.js with ease. Some of the standard architecture is already built into the Nest.js framework.
Because Nest.js uses modern technologies such as TypeScript, bullet-proof architectural patterns, excellent documentation, and easy unit testing, you can build scalable and maintainable enterprise-ready applications.
Nest.js was created for building large-scale monolith and microservices applications in which the architecture is already handled, and you only need to build out your business logic.
Nest.js supports and provides large community-based, nest-supported modules to build out any specific feature of your choice, from concepts like TypeORM, Mongoose, and GraphQL to logging, validation, caching, WebSockets, and much more.
Next, we’re going to explore the pros and cons of Nest.js. This will help solidify your decision to adopt the framework as we discuss both the good and the bad.
Pros and Cons of Nest.js
Here, we’ll enumerate the pros and cons of Nest.js for a better understanding of why it’s such a popular framework in the Node.js ecosystem.
The Pros
Some of the benefits of using Nest.js include:
Powerful but user-friendly: The framework is developer-friendly to work with, enough that even the most complex and powerful features are easy to use. The Nest.js team designed the framework for developers to quickly get started and focus solely on writing the business logic while the framework takes care of other important aspects of development, such as security.
Angular-style syntax (backend): Angular is a very popular frontend framework with a concentration on architecture and structuring. Nest.js acts as Angular for the backend because it uses Angular style and syntax to help you structure your enterprise project.
TypeScript: Nest.js supports TypeScript right out of the box, and this solves performance and writing maintainable applications quickly by providing compile errors and warnings. TypeScript makes it well-integrated into VSCode for an accessible development environment.
Thorough documentation: Nest.js features some of the best documentation for any framework, which is very easy to understand. It saves debugging time to quickly glance through the documentation and be greeted with the solution to your problem.
Good architecture and fast development: Nest.js saves you time when building out your application, whether you’re creating your first MVP or the actual application, because it gives you a solid structure and architecture to work with out of the gate, thereby enhancing your development processes.
The Cons
There is a famous saying: “Every advantage has its disadvantages” — and Nest.js is no exception. So, let’s explore the cons of Nest.js.
Difficult for novices: Nest.js can be a bit tricky for novice developers who are not coming from an Angular background to learn and master. Additionally, since not every JavaScript developer uses TypeScript, the framework can be difficult for these sets of developers too. But just like every other technology, it requires time and practice.
Arduous debugging: As much as TypeScript has its gains and benefits, it also comes with many debugging pains, especially for newer developers in the TypeScript world.
There you have it: the pros and cons of Nest.js and how they can influence your decision-making in choosing it as your framework of choice.
Next, we’ll practice building a RESTful API with Nest.js to solidify what we have learned so far. Read on to learn how to develop a to-do API that will allow users to create and manage their to-do lists.
Build Your First Nest.js RESTful API
Build Your First Nest.js RESTful API
It’s time to practice all we’ve learned about Nest.js by building our first RESTful API to demonstrate the power and simplicity that comes with it.
We’ll begin by setting up the framework and installing all the necessary tools to get it up and running.
1. Setting Up Nest.js
First, we install the Nest CLI to create new projects with this command:
npm i -g @nestjs/cli
After that, create a new project using this command below:
nest new nest-todo-api
cd nest-todo-api
npm run start:dev
Now that we have the Nest CLI installed and our new project created successfully, let’s build out our API.
Open the project in any code editor of your choice. If you visit localhost:3000, you should be greeted with a welcome message showing that everything works successfully.
Next, we’ll set up a MongoDB database to connect and manage our to-do data across the project.
Before we dive in, let’s generate all the files we’ll need to create the API with the following commands:
nest generate module todos
nest generate controller todos
nest generate service todos
2. Setting Up MongoDB
Next, we’ll install and configure MongoDB to work with the project we created earlier.
After installing MongoDB on your local machine, run the following command below to install the Mongoose library in our newly created project:
npm install --save @nestjs/mongoose mongoose
That’s all you need to do.
Next, we’ll generate the files and import the Mongoose to communicate with the project and MongoDB.
Let’s import Mongoose into our application module file before generating the other necessary files:
import { Module } from '@nestjs/common';
import { AppController } from './app.controller';
import { AppService } from './app.service';
import { MongooseModule } from '@nestjs/mongoose';
import { TodosModule } from './todos/todos.module';

@Module({
  imports: [MongooseModule.forRoot('mongodb://localhost/todos), TodosModule],
  controllers: [AppController],
  providers: [AppService],
})
export class AppModule {}
3. Building the Schema
Next, we’ll build the database schema for our database. This schema will specify how the data will be represented in our database.
Let’s define it in our todos.schema.ts file:
import * as mongoose from 'mongoose';
export const ItemSchema = new mongoose.Schema({
  title: String,
  is_completed: Boolean,
  description: String,
});
4. Defining Interfaces
Next, we’ll create an interface for type-checking.
Let’s define it in our interfaces/todo.interface.ts file:
import { Document } from 'mongoose';
export interface Item extends Document {
  id?: string;
  title: string;
  description?: string;
  is_completed: boolean;
}
5. Creating the DTO
Lastly, we’ll build out a DTO (Data Transfer Object) that defines how the data will be sent or passed from object to object over the network.
It’s a basic class with the same property as our schema:
// ./dto/create-todo.ts
export class CreateItemDto {
  readonly title: string;
  readonly description: string;
  readonly is_completed: boolean;
}
6. Setting Up Model/Service
The service file is responsible for interacting and communicating with the MongoDB database. It’s used for creating, retrieving, updating, and deleting records from the todos schema we created earlier.
Open your service file and add the following codes:
import { Injectable } from '@nestjs/common';
import { Todo } from './interfaces/todo.interface';
import { Model } from 'mongoose';
import { InjectModel } from '@nestjs/mongoose';
import { CreateTodoDto } from './dto/create-todo.dto';

@Injectable()

export class ItemsService {
  constructor(@InjectModel('Todo') private readonly todoModel: Model) {}
  async findAll(): Promise<Todo[]> {
    return await this.todoModel.find();
  }
  async findOne(id: string): Promise {
    return await this.todoModel.findOne({ _id: id });
  }
  async create(item: CreateItemDto): Promise {
    const newTodo = new this.todoModel(item);
    return await newTodo.save();
  }
  async delete(id: string): Promise {
    return await this.todoModel.findByIdAndRemove(id);
  }
  async update(id: string, todo: CreateTodoDto): Promise {
    return await this.todoModel.findByIdAndUpdate(id, todo, { new: true });
  }
}
The code snippet above represents a CRUD (create, read, update, delete) application on our API using the Mongoose model to provide them access to our underlying MongoDB database.
Next, we’ll create our controller file to handle all the logic and communicate with the service we’ve created above.
7. Setting Up Controllers
The controller is responsible for handling income requests and sending responses back to the client.
Let’s define our Todo controller and paste in the following code snippet:
import {
  Controller,
  Get,
  Post,
  Put,
  Delete,
  Body,
  Param,
} from '@nestjs/common';
import { CreateTodoDto } from './dto/create-todo.dto';
import { TodosService } from './todos.service';
import { Todo } from './interfaces/todo.interface';

@Controller('items')

export class ItemsController {
  constructor(private readonly todosService: TodosService) {}

  @Get()
  findAll(): Promise<Todo[]> {
    return this.todosService.findAll();
  }

  @Get(':id')
  findOne(@Param('id') id): Promise {
    return this.todosService.findOne(id);
  }

  @Post()
  create(@Body() createTodoDto: CreateTodoDto): Promise {
    return this.todosService.create(createTodoDto);
  }

  @Delete(':id')
  delete(@Param('id') id): Promise {
    return this.todosService.delete(id);
  }

  @Put(':id')
  update(@Body() updateTodoDto: CreateTodoDto, @Param('id') id): Promise {
    return this.todosService.update(id, updateTodoDto);
  }
}
The framework uses annotations to handle a lot of functionality behind the scenes — for example, to handle the routing system of the framework by providing different annotations corresponding to each route (@Put(), @Delete(), @Post(), @Get()) for RESTful API’s Put, Delete, Post, and Get respectively.
8. Testing the API With Postman
Lastly, we’ll test our newly created API with Postman. We need to start the development server to ensure everything is working properly before deploying to a live production server.
npm run start:dev
You can download and run Postman to test out your RESTful API.
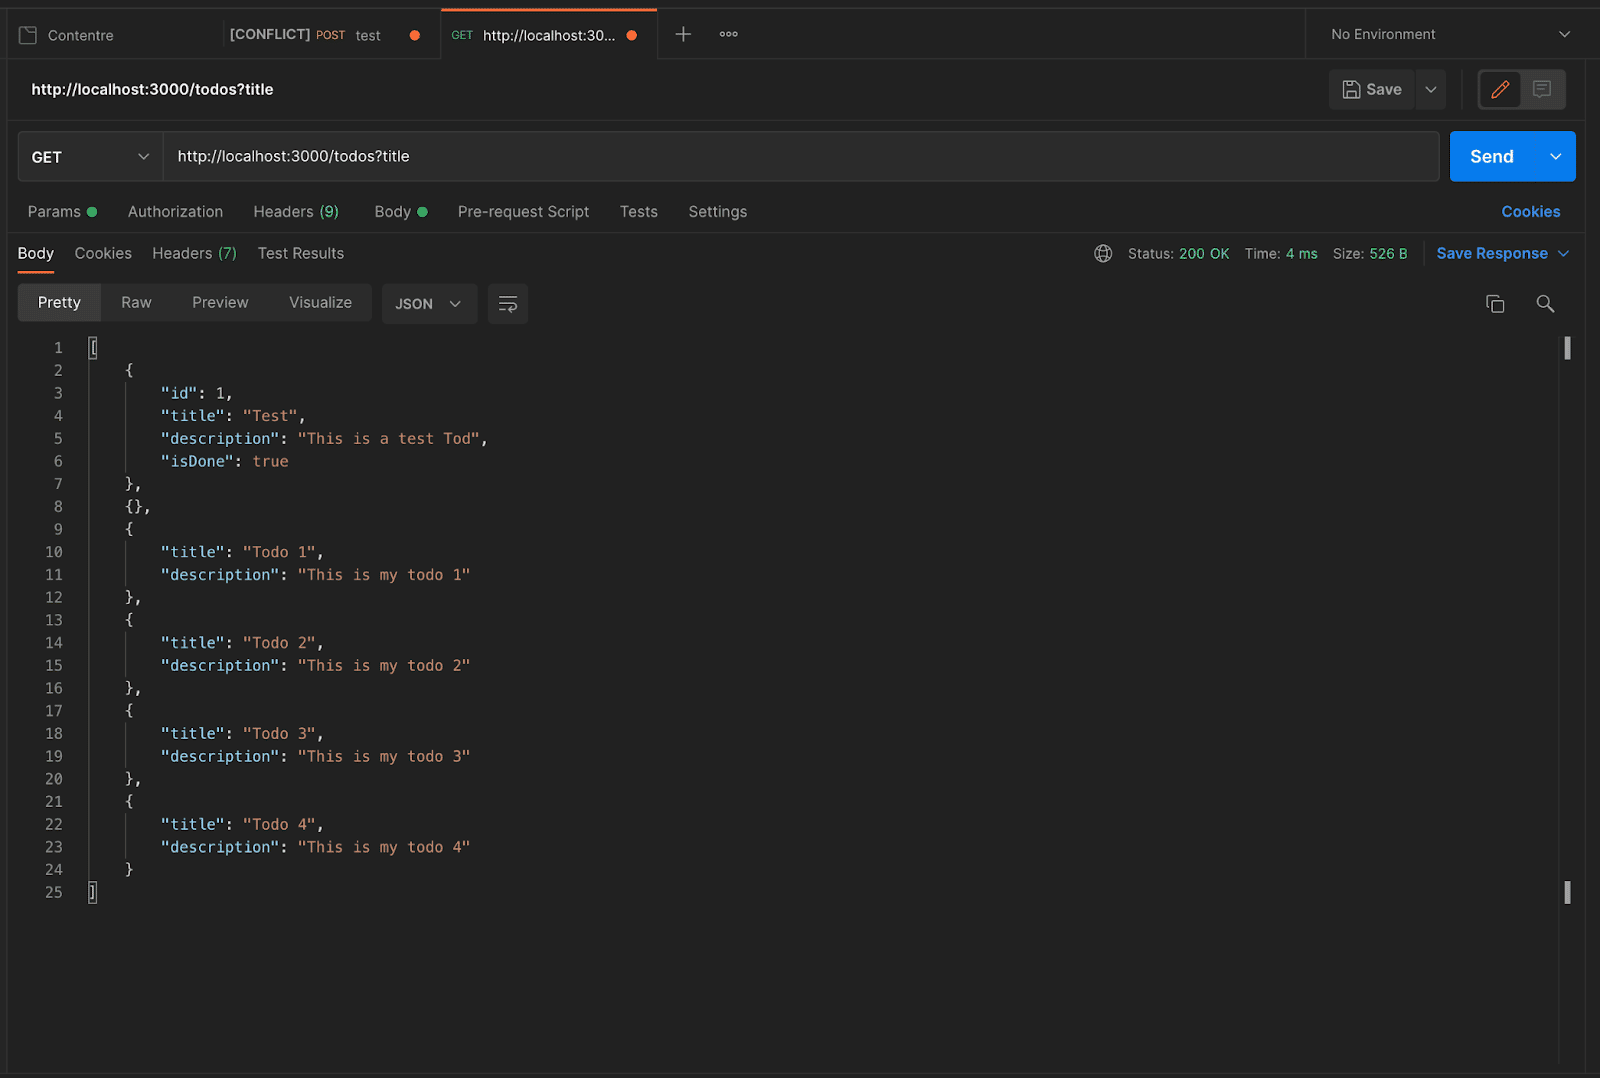
Nest.js to-do list result
Wondering what sets Nst.js apart from other Node.js frameworks? 👀 Learn more here ⬇️CLICK TO TWEET
Summary
Nest.js is a powerful Node.js framework and the most popular typescript framework available today.
It provides the engineering team with standard development architecture and industry best practices. With it, developers can abstract away repeated engineering processes to focus solely on developing the business logic.
These advantages are what trigger popular brands such as Adidas, Roche, and more to use the framework for their enterprise production applications.
In this article, we have laid a solid foundation for Nest.js and why you and your company should consider switching to it. Additionally, we built a simple to-do RESTful to practically demonstrate the awesomeness of the framework.
Now it’s up to you to decide if Nest.js is the perfect framework for you.
Get all your applications, databases and WordPress sites online and under one roof. Our feature-packed, high-performance cloud platform includes:
Easy setup and management in the MyKinsta dashboard
24/7 expert support
The best Google Cloud Platform hardware and network, powered by Kubernetes for maximum scalability
An enterprise-level Cloudflare integration for speed and security
Global audience reach with up to 35 data centers and 275 PoPs worldwide